
December 18, 2020
Tally ERP 9 GST is software for accounting, Inventory, Payroll, Statutory e-filing, Job Work, Manufacturing and many other aspects of accounting. Tally ERP9 provides different information to the management, with a combination of functionalities, controls and built-in customizability. So, let us explore the comprehensive GST features of Tally.
Induction of GST leads to the removal of multiple multiple-layered tax systems prevailing in India. According to article 366(12A), “Goods and services tax” means any tax on the supply of goods, services or both except taxes on the supply of alcoholic liquor for human consumption.

In order to enable the GST Features of Tally. ERP 9, follow the steps religiously;
Step 1: Firstly, go to Gateway of Tally (GOT)
Step 2: Next, click on F11: Features and then select F3: Statutory & Taxation
On the screen, the user can find the following options;
Step 3: After that, enable Goods and Service Tax (GST): to Yes.
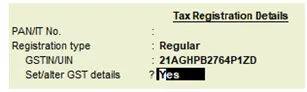
Step 4: Then, Set or alter GST Details to Yes
This will show another screen where the user can set the GST details of the selected company such as the state in which the company is registered, registration type, GSTIN number so on and so forth.
Step 5: Press Y or Enter to accept and save.
In Tally, users can access various essential GST reports, such as GSTR-1, GSTR-2, GSTR-3, and GSTR-3B. With the latest Tally updates, the software can seamlessly retrieve data directly from GSTN (Goods and Service Tax Network). Consequently, Tally users have the convenience of making GST payments directly to the government through the Tally.ERP9 Software.
Masters
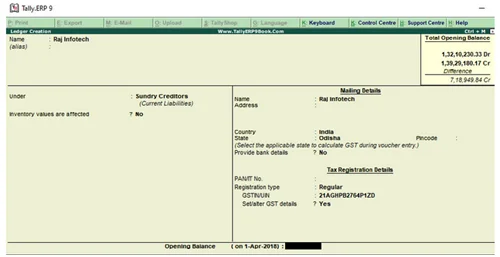
- Go to Gateway of Tally>Accounts Info.>Ledgers>Create.
- Then, enter the Name of the supplier’s ledger, such as ABC InfoTech.
- Afterward, select Sundry Creditors from the List of Groups in the Under field.
- Further, set the option Inventory values are affected? to No.
- In the Mailing details, the State is your default local State. Optionally, you can change the name of the State from the State List if your Suppliers belong to the Outside State.

• Enter the 15-digit GSTIN or UIN issued by the tax authority.
Press Ctrl+A to accept.
The Ledger Creation screen appears as shown below:
Master set up in GST:
GST Master Set up is of 2 types where users can either activate Regular Dealers or Composite Dealers.
Activate GST for Regular Dealers:
- Open the company for which you need to activate GST.
- Afterward, press F11 and then click on F3.
- Enable Goods and Services Tax (GST)– to Yes.
- Then, Set/alter GST details to Yes. Consequently, the GST Details screen will appear.
- State shows the state name as selected in the Company Creation screen. This helps in identifying local and interstate transactions according to the party’s state.
Note :
In the GST Details screen, users can change the State, and this change will impact the company master. Changing the state of the company will affect existing transactions. A warning message will appear when users change the state name to inform them of this effect.
- Set the Registration type as Regular.
- Set the option Assessee of Other Territory to Yes, only if your business unit is located in the Exclusive Economic Zone (other territory).
- Specify GST Applicable from date. GST will be applicable for your transactions from this date onwards.
- Specify the GSTIN/UIN for the business. This can be printed in the invoices as required. You can specify this later.
- Select the Periodicity of GSTR1 as Monthly or Quarterly, based on your business turnover.
- The option e-Way Bill applicable is set to Yes, with the Applicable from the date and Threshold limit.
- Select the value to be considered for e-Way Bill for the optionThreshold limit.
- Set the optionApplicable for intrastate to Yes, if it applies to your State and enter the Threshold limit.
- Set the option Enable tax liability on advance receipts to Yes to activate calculation of tax liability on advance receipts. This option is disabled by default.
- Set the option Enable tax liability on reverse charge (Purchase from unregistered dealer) to Yes to activate the calculation of tax liability for the reverse charge on URD purchases. This option is disabled by default.
- Enable the option Set/ alter GST rate details? to enter the GST details at the company level.
- Set the option Enable GST Classification? to Yes, to create and use the classifications in GST Details screen of masters.
- Set the option Provide LUT/Bond details? to Yes, to enter the LUT/Bond No. and Validity period.
- Press Enter to save.
Activate GST for Composition Dealers
Points 1 to 14 are the same as Regular Dealers
- Set the option Enable tax rate for purchase (Includes purchases under reverse charge) to:
- Yes, to enter the GST rate in the ledgers and stock items for calculating GST in transactions.
- No, to specify the GST rates in each transaction for calculating GST
- Press Enter to save.
Transaction in entry Tally ERP:
- Go to Gateway of Tally >Accounting Vouchers >F8: Sales .
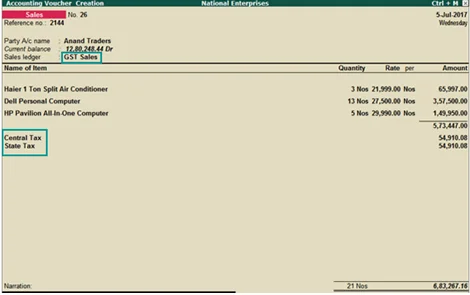
- In Party A/c name, select the customer ledger or the cash ledger.
- Select the common sales ledger in which GST rate is not defined.
- Select the stock items defined with different GST rates, and specify the quantities and rates for each of them.
- After that, select the central and state tax ledgers. GST will be calculated based on the GST rates defined in the stock items.
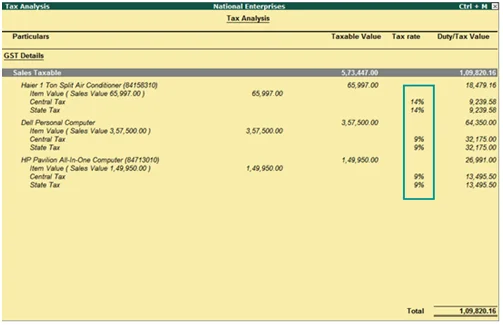
You can view the tax details by clicking A: Tax Analysis. After that, click F1: Detailed to view the tax break-up.
Master report in GST Tally ERP:
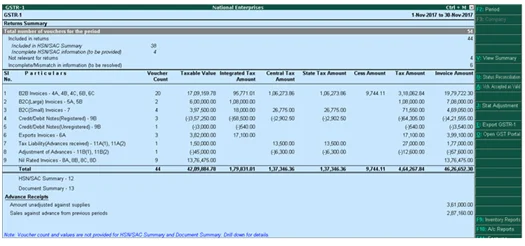
Generating GSTR – 1 report
Step 1: Initially, go to Gateway of Tally
Step 2: Click on Display
Step 3: After that, click on Statutory Reports
Step 4: Then, click on GST
Step 5: Now select GSTR-1
Step 6: Users can press Alt +V in GSTR-1 report to change the view from return format to summary view and vice versa.
Step 7: Specify the required reporting period by pressing F2.
Step 8: The user can generate the report with the line HSN or SAC Summary by enabling the option Show HSN or SAC Summary.
Step 9: The user can generate the HSN or SAC Summary report with only the description or HSN or both, based on the grouping set in the option Group vouchers by.
Step 10: If HSN or SAC description is not specified in the masters, you can set the option “Use stock item or ledger name as HSN or SAC description when not specified” to Yes. Consequently, the stock item or ledger name will then appear as the HSN or SAC description.
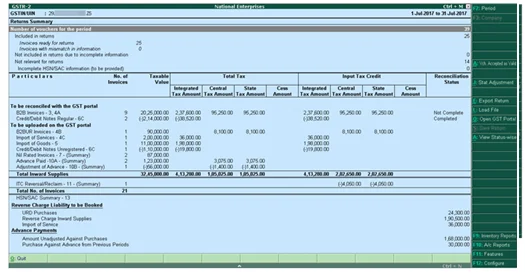
Generating GSTR – 2 report
Step 1: Firstly, go to Gateway of Tally
Step 2: After that, click on Display
Step 3: Further, click on Statutory Reports
Step 4: Then, click on GST
Step 5: Now, select GSTR-2
Generating GSTR – 3B report
Step 1: Initially, go to Gateway of Tally
Step 2: Next, click on Display
Step 3: Further, click on Statutory Reports
Step 4: Then, specifically click on GST
Step 5: After that, select GSTR-3B
Step 6: The report is in the same format as GSTR-3B in the GST Portal.
Step 7: Take a printout of the report
Step 8: Then, go to GST Portal and fill in all the details manually.
Step 9: Submit your return, pay taxes (if any) and file your GSTR-3B.
Printing the report:
Step 1: Press Ctrl + P to initiate the printing of the GSTR-3B report.
Step 2: In the Print Report screen, press Enter. Subsequently, the report is created in Word format.
Step 3: Then, press Ctrl+S to save the Word file.
